Building Clickthrough Prototypes To Support Participatory Design

Email Newsletter
Weekly tips on front-end & UX.
Trusted by 200,000+ folks.


 Flexible CMS. Headless & API 1st
 Register!
As UX professionals, we often lead design exercises with our stakeholders, including immediate team members and external clients. In these brainstorming sessions, participants identify opportunities to improve the design, thereby aligning everyone’s vision and expectations of the project.
During such activities, teams will generate concepts as paper or whiteboard sketches. While these artifacts give a ten thousand-foot view of the emerging design, I would argue that they fall short of presenting the pieces as a whole, because they limit participants from visualizing interactivity and the system’s flow. This is where clickthrough prototypes enter the picture.
This article will look at clickthrough prototyping on the iPhone with the Prototyping on Paper (or POP) app. I’ll also cover how prototyping fits into participatory design and why sketching is a prerequisite. My goal is to introduce the tool, share my prototyping experience and discuss competitors. To illustrate the app’s functionality, I’ve designed a simple mobile Web experience for a hypothetical news website (you can find the link at the end of this article). Let’s explore POP!
The Importance Of Prototyping
Wireframes are ineffective at capturing dynamic elements such as flow, interaction and animation, and participants are forced to digest tens, if not hundreds, of PDF pages. Todd Warfel mentions in Prototyping: A Practitioner’s Guide that prototyping adds collaboration to a project. I would add that prototyping breathes life into a design, giving it direction. Its iterative nature enables us to accelerate testing of multiple concepts, so that the best design survives the many rounds of brainstorming.
Prototyping can be done with a variety of techniques and tools, some purpose-built and others adopted out of necessity. In his book Sketching User Experiences: The Workbook, Bill Buxton does a great job of explaining prototyping techniques in the context of sketching, both on paper and digitally. Prototyping also comes in different levels of interactive fidelity: sketching and paper mockups will evolve into clickthrough prototypes, which will graduate into high-fidelity prototypes with complex event models. For an in-depth classification of prototyping tools, consult Ritch Macefield’s article “Are You Still Using Earlier Generation Prototyping Tools?”

A sample prototyping toolkit of a UX practitioner. Large View.
High-Fidelity Prototypes Fall Short
Participatory design is fast, with many interruptions. Individuals present their ideas, opinions are flying high, and designs are constantly modified. So, it is safe to ask how prototyping can be used efficiently to capture the conceptual designs that are created. Are high-fidelity prototypes the answer?
High-fidelity prototypes require up-front planning, intimate knowledge of the software’s inner workings and expertise in best practices, which are obstacles for technologically unsavvy participants. The greater the complexity, the more time and money is required to implement structural changes. Updating a complicated prototype during a participatory design process can be a nightmare. Instead, by using simpler prototypes that rely on clickthrough experiences, we can with little effort stitch together the sketches generated from brainstorming sessions, helping to more clearly communicate the design concepts.
Clickthrough Prototypes Are The Answer
Many UX design applications support it, but what exactly is a clickthrough prototype? A clickthrough prototype links multiple screens via hotspots (a hotspot is a screen area that, once interacted with via a click or tap, redirects the user to the target screen). A screen may have hotspots to multiple other screens, allowing you to put together complicated flows without having to focus on interactivity.
There are two types of clickthrough prototypes. In the first (the focus of this article), photographs of whiteboards or paper templates are loaded into the prototyping software and then linked together. The second reproduces the same sketches using interactive software widgets, with built-in UI interactivity (for example, swipe detection, form customization, etc.). A good example of this is the Interface app by LessCode (available for iPhone and iPad).

This example of the second type of clickthrough prototype illustrates hotspot linking. Large View.
Sketch Ideas First
Before digitizing our prototypes with POP, we need to sketch first. Sketching is necessary for clickthrough prototyping because it helps to organize the prototype and provides linkable assets. In participatory design, sketches record site maps, UI screens, user journeys and other early artifacts that form the project. Sketching has no technical barrier to entry, and even the least experienced person can learn to communicate visually in this way. It also frees you from having to rework clickthrough prototypes in a few ways: first, by creating modifiable throwaway assets; secondly, by generating many ideas; and thirdly, by enabling participants to expand on each other’s ideas.
I have been exposed to three approaches to sketching, and each has a place in the UX arsenal:
- whiteboard sketching as a team,
- capturing ideas individually via paper templates,
- brainstorming with a mobile application.
Approaches To Participatory Design Sketching
Whiteboarding
Smart whiteboards, such as eno, facilitate collaboration between local team members and geographically distributed resources. Assets can be saved as digital images and redistributed after a meeting. Non-digital whiteboards are fairly affordable; dry-erase sheet tape by GOwrite turns any surface into a whiteboard. While the equipment is inexpensive, it requires considerable space and, thus, is best suited to group meetings.

This eno smart whiteboard shows sketched mobile designs. Large view.
Paper Templates
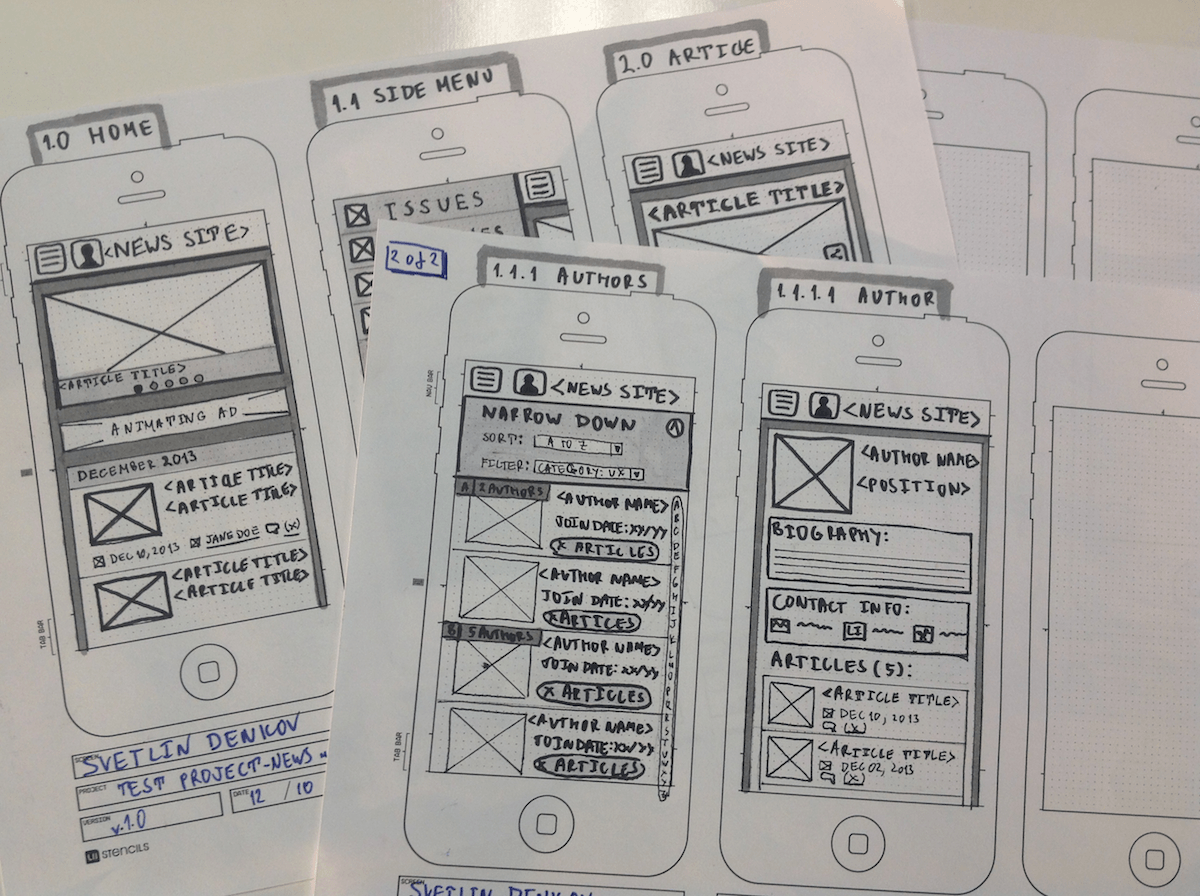
Individual paper templates are most appropriate when groupthink needs to be avoided during idea generation. Paper templates offer portability, which is helpful for organizing screens into flows and for prioritization activities. These paper designs are easily reproducible via a photocopy machine, which facilitates reusability and annotation. This approach comes with almost no cost because most templates are free PDF files (see the iPhone 5 sketching templates in the “Useful Resources” section at the end of this article) and the drawing supplies are inexpensive. Designs may be digitized via a camera or scanner, though, which is time-consuming.

Paper templates are available for every platform. Illustrated here is the iPhone 5 template by UI Stencils. Large view.
Sketching On Phone
The least common approach is to sketch directly on a phone. Human input is not ideal for digital drawing, given the large surface area of a fingertip. Therefore, to improve precision, a capacitative touch stylus, such as Jot Pro ($30), is a must-have. Before you digitally sketch, consider a few things. How will the sketches be exported? Secondly, are you targeting a particular resolution? Thirdly, how much collaboration is required. No digitization is required, but it comes at a cost: All participants must have a smartphone and stylus. Additionally, an app such as SketchBook Pro ($1) must be loaded onto the devices.
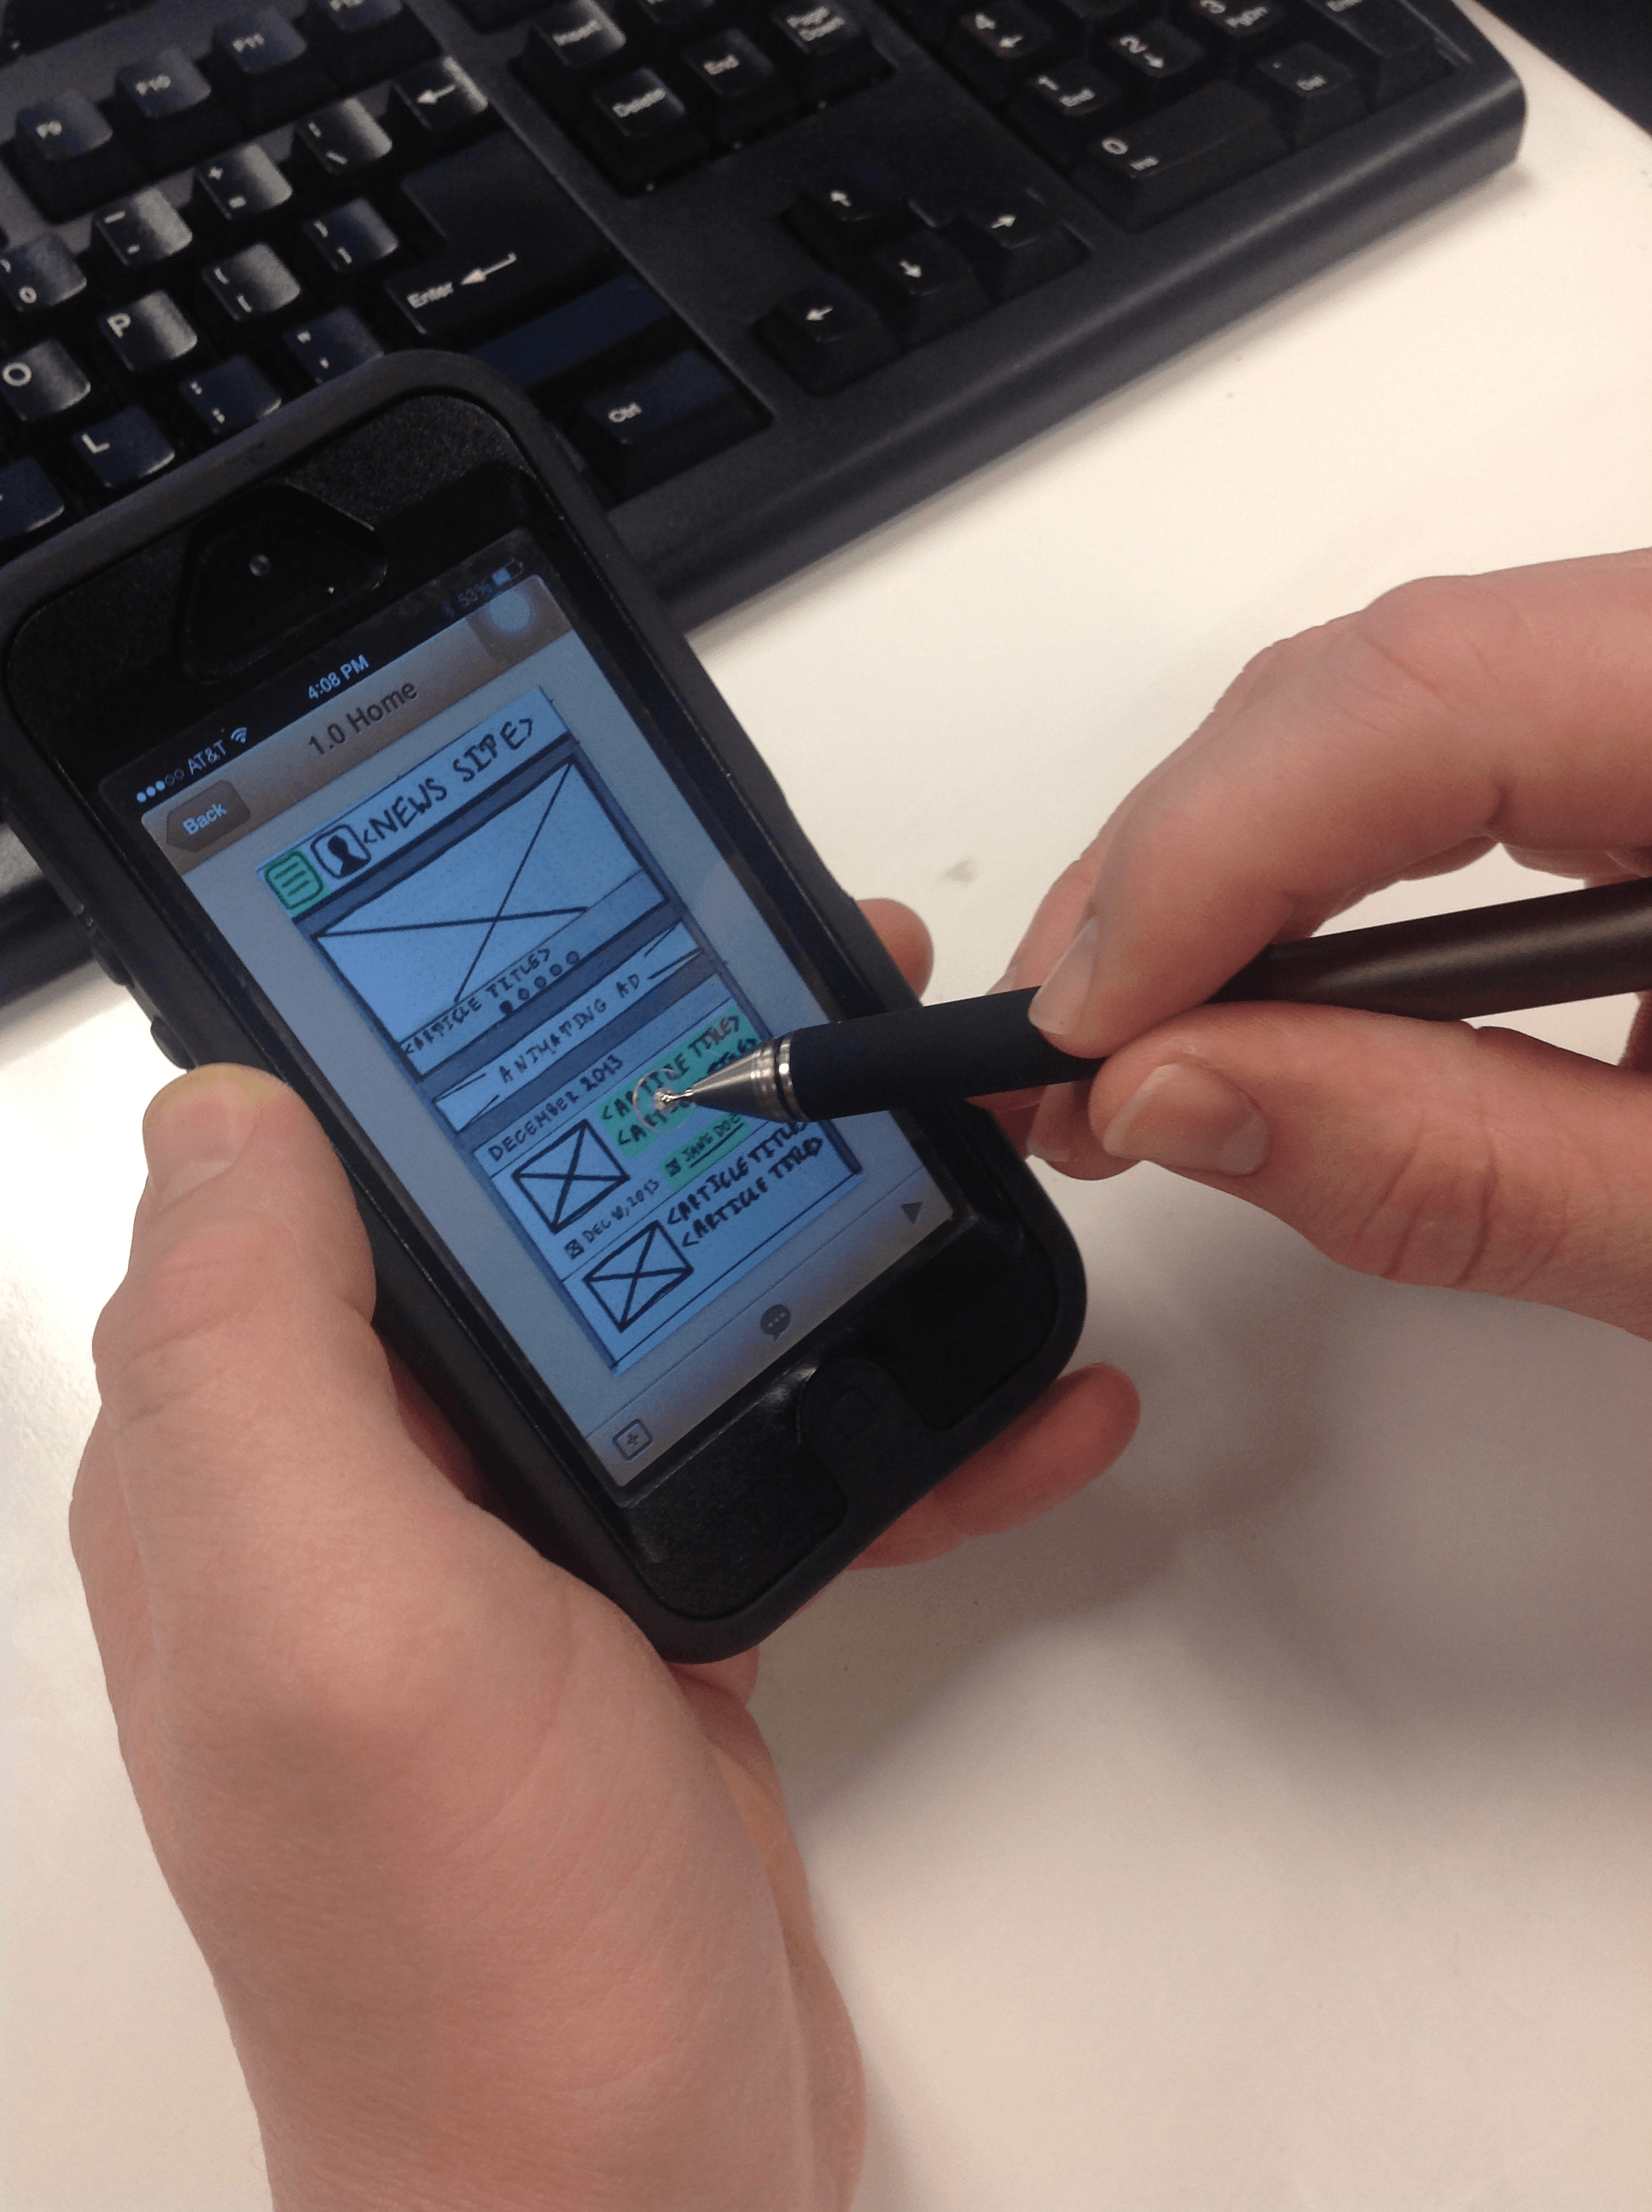
A stylus works on clear cases, but for best results remove the protective cover. Large view.
Sketching is low cost, quick to digitize and easily reproducible, making it the perfect way to create the building blocks of clickthrough prototypes on mobile devices and tablets. Let’s see how sketches can be used to build interactive flows on the iPhone using POP.
Sketch-Based Clickthrough Prototypes With POP
Let’s say that we’ve sketched some mobile Web designs in a group brainstorming session. Now, we want to link them together without having to fire up a complicated tool such as Axure. How do we do that? Using POP.
POP is an iOS and Android application that enables you to link together paper designs into an interactive clickthrough prototype. Currently, it is free, and users get between 5 and 20 projects at no charge. According to the application’s developer, Woomoo, paid plans are coming, but no information is available yet.

Sharing POP with your social networks increases your chance of being able to create more projects.
To use POP, create an account with an email address. The account is required to store prototypes on Woomoo’s servers and to add other POP members to a project (more on that later).
Create A Project
Identify which paths of the experience to capture and which controls to enable for navigating these paths. Address these issues while sketching in the brainstorming session, which in turn will streamline the process of building the prototype in POP.
Creating a new project container is the first step. Click the “+” icon in the menu bar of the “Projects” screen to enter the project’s information. Creating the project’s container will update the number of existing projects in the menu bar. You can edit an existing project via the “Edit” button in the header; a project may be removed or its information may be modified by changing the project’s picture, adding members, etc. Additionally, you can control which type of projects to display. In my experience, this option comes in handy when searching for a particular project in a long list of entries. To do so, click on the “Projects” dropdown menu, which allows you to filter by “All Projects,” “Favorites” or “Shared Projects.”

This screen shows a list of existing projects.
Enter information about the project, such as name and visibility status, on this screen. Private prototypes are viewable only by POP users who have been invited to the project, while public ones, as you would expect, are viewable by anyone.

By default, new projects are set to “public.”
Load The Sketches
Once you’ve created the project’s container, add the visual assets that will be linked together. This is an iterative process. You can either snap a picture of a sketch using the camera icon (the first option in the menu bar) or load a sketch that already exists on the device using the landscape icon (the second option in the menu bar). If you opt to load pictures, do it in one sitting and in the order of the navigation flow, which will help later on with identifying assets for linking targets.

No sketches have been loaded in the project yet.
Once the image has been aligned in the frame, you can capture it with the red button. “B&W” toggles grayscale mode, in case you need to present the clickthrough prototype without much styling.

Use good lighting and steady your arm to get clear pictures.
Save the new photograph, or retake it to correct alignment or blurriness. Make sure your paper templates match the resolution of the target device, which will save you from having to extensively adjust the picture’s size. If the picture does not fit perfectly, that’s fine, as long as the main UI components have been captured.

Resizing helps you to capture the navigation and other UI controls.
If you have already taken pictures of the sketches (say, via the default Camera application), you can load these images directly. Choose the relevant loading option to see existing image albums and the separate “Paper Screens” album for POP images.

The top entry is always the device’s album, which contains all available pictures.
Add Hotspots
Next, add interactivity to link the screen images. Access each screen individually, and create hotspots over the relevant UI areas. Tap the “+” icon in the menu bar to create a red hotspot, which can then be removed or linked to a screen.

The menu bar bubble icon enables you to enter notes and a title for the screen.
Tap the “Link to” option to select a target screen. Hotspots are not conditional: You cannot link the same hotspot to multiple screens based on events specified in the UI flow. POP currently offers no such feature. However, the application supports a list of built-in transitions, as seen in the menu bar of the “Link to” screen. These will help you to simulate the intended user experience. “None” is selected by default.

Swipe the menu bar left and right the explore the list of available transitions.
Once a hotspot has been linked to a screen, it will change to green, indicating that it is active. You may freely move a hotspot by tapping and holding on the main area of the hotspot. Additionally, you can resize it in any direction using one of the four dot handles. This will help you to adjust the mask size for the necessary UI controls, giving you more flexibility.
Existing hotspots have a “Copy” option, which is useful for duplicating hotspots of similarly sized UI controls. There is no method for varying the depth of hotspots (on the z-axis). The most recently created hotspot will always be placed on top. As a best practice, avoid stacking hotspots, or else they will mask one another, which will require you to troubleshoot a lot to identify broken interactions!
Play The Prototype

The “play” icon starts the demo of the prototype from the current screen.
Once all screen sketches have been linked with the appropriate hotspots, the prototype is ready for testing. Play the prototype before exporting to troubleshoot any problems (for example, hotspot links to incorrect screens, wrong hotspot sizes or positions, missing hotspots, etc.).
Play the prototype from either the main project screen or any individual screen. Either way, the “play” icon will be located in the menu bar. Tap the icon to launch the prototype in full screen. Tap the hotspots to load the linked screens using the specified transitions. If you tap on the screen away from any hotspot, then the application will briefly highlight all of the available hotspots on the screen.

Full-screen mode eliminates POP’s chrome, showing only the sketches.
POP does not include target information in the hotspots (such as screen names), so as a best practice, if you are demoing the prototype to others, become familiar enough with the flows to avoid presentation problems. At the moment, POP gives no instructions on how to quit playing the prototype. This information is hidden in the application’s FAQ section, under the “Help” menu item, which is cumbersome to locate. Let me save you the trouble of finding it: To exit playing mode, press the iPhone’s volume down key. Pressing the volume up key allows the viewer to add comments to the current screen.

If a project is shared with other members, they can add comments here.
Distribution Options
Once you’ve verified that the clickthrough prototype works correctly, you will be ready to distribute it. You have several options, which are accessible by tapping on the arrow icon on the project container screen (the last item in the menu bar).

If many images exist, you can scroll vertically to access additional entries.
The first option is to send an email. Selecting this option will create an email draft, with a link to the POP prototype on Woomoo’s servers. Because adding the recipients is your responsibility, try to add their information to your device’s contact app beforehand, or at least have the information on hand. Once they have received the email, the recipient may access the prototype either on a mobile device or a computer. If they’re accessing on a mobile device, such as an iPhone, then they can view the prototype in the browser or add a shortcut to it on the home screen. The email method works best if you are sharing the prototype with people outside of the participatory design session.

The email includes a link to POP’s website.
The next option is to share over a social network. POP offers Facebook and Twitter. You can publicly broadcast a message on a social network with a link to the prototype (POP must be granted access to the social network’s application). I have not found a good use for this option because most of my work is proprietary and has to stay in-house. Depending on your team’s culture and the project’s needs, this option might be worth exploring, but check with the project manager first!
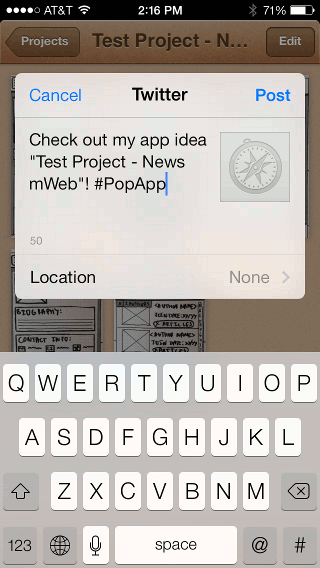
Share your project in either a Twitter or Facebook post.
Lastly, you can share the prototype with other POP members by adding them to your list of approved viewers. This is useful if you are working on a large team of designers who also use POP. Click the “+” icon to search for members in POP’s network. This approach is handy if many of the participants in the design process have POP already loaded on their mobile device. However, the burden is on them to create a POP account in order to view the prototype.

Search results include matches of first and last names.
While not a distribution method per se, one last method enables you to show a prototype to participants in a design session, by loading it in a Web page on a computer connected to a projector. Additionally, you can use Reflector (an app that uses the AirPlay protocol to stream data from an iOS device to a computer) to mirror your phone’s screen onto a desktop computer that is connected to a projector. For more information on using Reflector, visit the application’s website.
Related Solutions
POP is not the only tool that supports the creation of clickthrough prototypes from paper sketches. More applications are becoming available on the iPhone. Below are the two most robust competitors to POP.
Launch
Launch has a free single-project plan as well as paid monthly plans for both Android and iPhone. It shares many of POP’s features, including screen transitions, exporting and feedback capabilities. Additionally, the app enables designers to use Dropbox pictures, as well as to specify the target device. Launch is very new (released in February 2014), so it will be interesting to see how it performs against POP going forward.
Protosketch
UI Stencils offers Protosketch for iPhone ($4.99), which has comparable functionality. While a complete discussion of this tool is beyond this article’s scope, suffice it to say that POP currently has richer functionality. At the time of writing, Protosketch does not support transitions and has fewer distribution options. Despite these limitations, Protosketch is a great tool that can be used to build iOS experiences designed on the company’s paper templates.
Takeaways
Pros Of POP
- Short learning curve
- Multi-platform support
- Leverages the device’s camera to capture sketches
- Offers rich transition and exporting options
Cons Of POP
- Event model is limited to a single tap
- Complex prototypes are harder to maintain due to large number of images
- Variations require separate images because dynamic states are not supported
- A separate image of a common design element (such as top navigation) cannot be used in multiple screen sketches as a master module
- Application is young and has room to grow feature-wise
Closing Thoughts
POP is best suited for capturing the flow and overall organization of a design concept, not for illustrating detailed interaction. Furthermore, the tool’s ease of use enables UX designers to deliver clickthrough prototypes quickly in participatory design sessions, making it a valuable addition to any design toolkit. I hope you find this little application to be useful. Give it a try, and happy prototyping!
Useful Resources
Example used in this article:
- Test Project, POP A cloud-based demo of a clickthrough prototype made with POP
iPhone 5 paper templates:
- Free Printable iPhone 5, iPhone 5s, and iPhone 5c Templates, Matthew Stephens (free) Two different templates of three and six screens per page
- iPhone Stencil Kit, UI Stencils (free) A4 and Letter formats are available in the downloads section. Each page has three screens, with dedicated comments panels.
- iPhone Sketch Pad, UI Stencils ($14 per pad) Each pad has 50 sheets, with three screens per sheet and dedicated comments panels.
Apps discussed in this article:
Prototyping:
- “Designing With Paper Prototyping,” Thomas Davies, UX Booth
- “Mobile UX: From Principles to Prototypes,” Rachel Hinman, UX Immersion Conference 2012
- “Paper-in-Screen Prototyping,” Diego Pulido, UX Magazine
Sketching:
- “The Messy Art of UX Sketching,” Pieter Buick, Smashing Magazine
- “Our Favorite Tools for Sketching,” Leah Buley, Adaptive Path
- Sketching User Experiences: The Workbook, Saul Greenberg, Sheelagh Carpendale, Nicolai Marquardt and Bill Buxton
Further Reading
- Optimizing Your Design For Rapid Prototype Testing
- Choosing The Right Prototyping Tool
- Content Prototyping In Responsive Web Design
- Resurrecting User Interface Prototypes


